[NestJs][typeorm] 기본적인 관계형 database를 만들어 보자
목차
자주 사용되는 TypreOrm 컬럼들
import {
Column,
CreateDateColumn,
Entity,
Generated,
OneToOne,
PrimaryGeneratedColumn,
UpdateDateColumn,
VersionColumn,
} from 'typeorm';
import { ProfileModel } from './profile.entity';
enum Role {
USER = 'user',
ADMIN = 'admin',
}
enum Card {
USER = 'user',
YEAR = 'year',
}
@Entity()
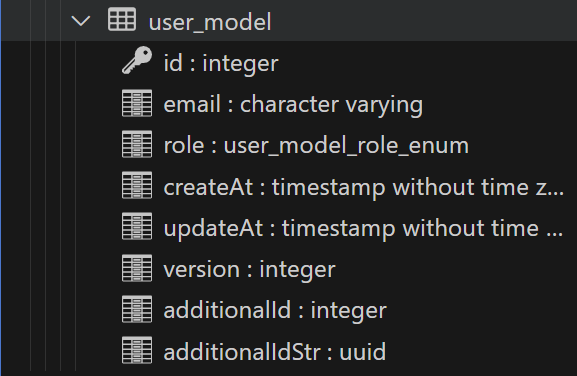
export class UserModel {
//절대적으로 겹치지 않는 칼럼 생성
//PrimaryGeneratedColumn()
//Primary Column() -> 모든 테이블에서 기본적으로 존재해야 한다.
//테이블 안에서 각각의 Row를 구분 할 수 있는 칼럼이다.
//@PrimaryGeneratedColumn('uuid')
//PrimaryGeneratedColumn() -> 순서대로 위로 올라간다.
//
@PrimaryGeneratedColumn()
id: number;
@Column()
email: string;
@Column({
//데이터베이스에서 인지하는 칼럼 타입
default: 'default',
type: 'varchar',
//db칼럼 이름
name: 'title',
//null 가능 여부
nullable: false,
length: 10,
//true면 처음저장할 때만 값 지정 가능
//이후에는 값 변경 불가능
update: false,
//get 요청을 했을 때 거를 수 있음
//ex) 회원 가입 이메일
unique: false,
})
title: string;
@Column({
type: 'enum',
enum: Role,
default: Role.USER,
})
role: Role;
// 데이터 생성 일자
// 데이터가 생성되는 날짜와 시간이 자동으로 찍힘
@CreateDateColumn()
createAt: Date;
// 데이터 업데이트
//데이터가 업데이트되는 날짜와 시간이 자동으로 찍힘
@UpdateDateColumn()
updateAt: Date;
//데이터가 업데이트 될때마다 1씩 올라간다.
//처음 생성되면 값은 1이다.
@VersionColumn()
version: number;
//증가하는 숫자 생성 겹침 존재 가능
@Column()
@Generated('increment')
additionalId: number;
@Column()
@Generated('uuid')
additionalIdStr: string;
}
one-to-one relationship 만들기
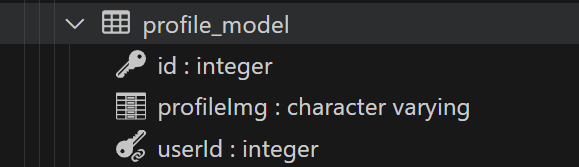
profile 모델을 user 모델에 연결하기
UserModel entity
import {
  Column,
  Entity,
  JoinColumn,
  OneToOne,
  PrimaryGeneratedColumn,
} from 'typeorm';
import { UserModel } from './user.entity';

@Entity()
export class ProfileModel {
  @PrimaryGeneratedColumn()
  id: number;

  @OneToOne(() => UserModel, (user) => user.profile)
  @JoinColumn()
  user: UserModel;

  @Column()
  profileImg: string;
}
이때 @joinColum()은 외래키를 통해 관계의 주도권을 결정한다.
따라서 profileModel에 @JoinColumn을 썻기 때문에 UserModel이 주도권을 갖는다.
import {
  Column,
  CreateDateColumn,
  Entity,
  Generated,
  OneToOne,
  PrimaryGeneratedColumn,
  UpdateDateColumn,
  VersionColumn,
} from 'typeorm';
import { ProfileModel } from './profile.entity';


@Entity()
export class UserModel {
  .
  .
  .

  @OneToOne(() => ProfileModel, (profile) => profile.user)
  profile: ProfileModel;
}
one-to-many relationship 만들기
PostModel entity
import {
  Column,
  Entity,
  ManyToOne,
  PrimaryGeneratedColumn,
} from 'typeorm';
import { UserModel } from './user.entity';

@Entity()
export class PostModel {
  @PrimaryGeneratedColumn()
  id: number;

  @ManyToOne(() => UserModel, (user) => user.posts)
  author: UserModel;

  @Column()
  title: string;
}
이때 @JoinColumn은 쓰지 않아도 된다.
자동으로 oneToMany를 가진 쪽이 주도권을 갖는다.
import {
  Column,
  CreateDateColumn,
  Entity,
  Generated,
  OneToMany,
  OneToOne,
  PrimaryGeneratedColumn,
  UpdateDateColumn,
  VersionColumn,
} from 'typeorm';
import { ProfileModel } from './profile.entity';
import { PostModel } from './post.entity';


@Entity()
export class UserModel {
  .
  .
  .

  @OneToMany(() => PostModel, (post) => post.author)
  posts: PostModel[];
}

many-to-many relationship 만들기
many to many는 이해가 잘 안가서 정리하면 다음과 같다.
두 개의 entity를 참조하는 집합. 즉 테이블 두 개의 관계를 참조하는 또 하나의 테이블이 있는 상황이다.
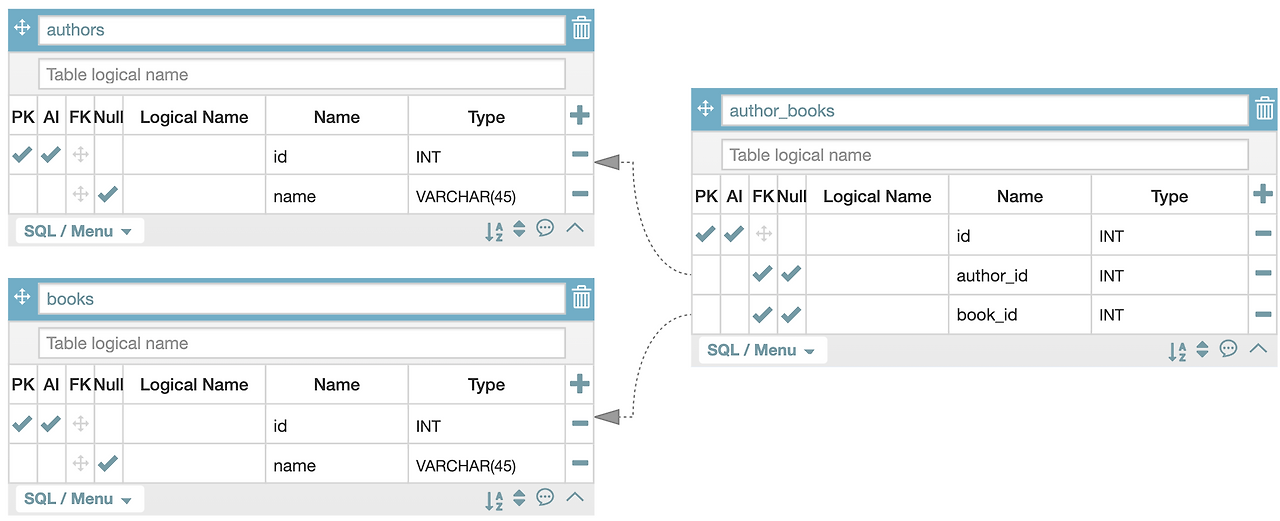
보통 게시물과 태그의 관계에서 이 관계가 쓰인다.
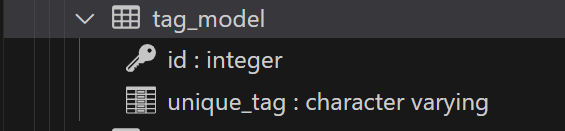
TagModel entity
import { Column, Entity, ManyToMany, PrimaryGeneratedColumn } from 'typeorm';
import { PostModel } from './post.entity';

@Entity()
export class TagModel {
  @PrimaryGeneratedColumn()
  id: number;

  @ManyToMany(() => PostModel, (post) => post.tags)
  posts: PostModel[];

    //태그는 고유하므로 unique: true
  @Column({
    name: 'unique_tag',
    unique: true,
  })
  name: string;
}
PostModel entity
한쪽에 joinTable을 통해 연결해 주어야 한다.
import {
  Column,
  Entity,
  JoinTable,
  ManyToMany,
  ManyToOne,
  PrimaryGeneratedColumn,
} from 'typeorm';
import { UserModel } from './user.entity';
import { TagModel } from './tag.entity';

@Entity()
export class PostModel {
  @PrimaryGeneratedColumn()
  id: number;

  @ManyToOne(() => UserModel, (user) => user.posts)
  author: UserModel;

  @ManyToMany(() => TagModel, (tag) => tag.posts)
  @JoinTable()
  tags: TagModel[];

  @Column()
  title: string;
}
다음과 같이 양방향 레퍼런스가 가능해진다.
app.controller.ts(서비스 로직 분리 x)
  @Post('users/tags')
  async cratePostsTags() {
    const post1 = await this.postRepository.save({
      title: 'NestJs',
    });

    const post2 = await this.postRepository.save({
      title: 'NextJs',
    });
    const tag1 = await this.tagRepository.save({
      name: 'javascript',
      posts: [post1, post2],
    });
    const tag2 = await this.tagRepository.save({
      name: 'typescript',
      posts: [post2],
    });

    const post3 = await this.postRepository.save({
      title: 'NodeJs',
      tags: [tag1, tag2],
    });
    return true;
  }

  @Get('posts')
  getPosts() {
    return this.postRepository.find({
      relations: {
        tags: true,
      },
    });
  }

  @Get('tags')
  getTags() {
    return this.tagRepository.find({
      relations: {
        posts: true,
      },
    });
  }

그외 관계형 옵션
eager: true
  @OneToOne(() => ProfileModel, (profile) => profile.user, {
    eager: true,
  })
  profile: ProfileModel;
user.entity 에서 eager true옵션을 써주게 되면 relations로 get 옵션에 설정해 줄 필요가 없다.
 @Get('users')
  getUsers() {
    return this.userRepository.find({
      relations: { //user와의 관계형 db가져옴
        profile: true,
        posts: true,
      },
    });
  }
cascade:true
@OneToOne(() => ProfileModel, (profile) => profile.user, {
    cascade: true,
  })
  profile: ProfileModel;
이런식으로 한번에 저장할 수 있게 만들어 준다.
  @Post('users/profile')
  async createUserAndProfile() {
    const user = await this.userRepository.save({
      email: 'sins051301@naver.com',
      profile:{
        profileImg: 'asg.jpg'
      }
    });

    // const profile = await this.profileRepository.save({
    //   profileImg: 'asd.jpg',
    //   user,
    // });
    return user;
  }
nullable: false
@OneToOne(() => ProfileModel, (profile) => profile.user, {
    nallable: false,
  })
  profile: ProfileModel;
기본 값은 true로 false로 설정하게 되면 null이 들어가면 500 에러가 발생하게 된다.
onDelete
  @OneToOne(() => ProfileModel, (profile) => profile.user, {
    //관계가 삭제되었을 때
    //no action-> 아무것도 안함
    //cascade -> 참조하는 row도 같이 삭제
    //set null -> 참조하는 row에서 참조 id를 null로 변경
    //set default -> 기본 세팅으로 설정 (테이블의 기본 세팅)
    //restrict -> 참조하고 있는 row가 있는 경우 참조당하는 row 삭제 불가
    onDelete: 'CASCADE',
  })
주의
OneToOne 관계는 @JoinColumn의 위치에 따라 어떤 테이블에서 Foreign Key를 레퍼런스 하고 있을지 결정하게 되는데
이것에 따라 삭제의 전파 여부가 다르게 결정된다.
또한 JoinColumn을 한 곳에 cascade를 써주어야 한다.
get 관련 필터 옵션
 @Get('users')
  getUsers() {
    return this.userRepository.find({
      //어떤 프로퍼티를 선택할지
      //기본은 모든 프로퍼티를 가져온다.
      //만약에 select를 정의하지 않으면
      //select를 정의하면 정의한 프로퍼티를 가져온다.
      select: {},

      //필터링할 조건을 입력하게 된다.
      where: [
        {
          version: 2,
        },
        {
          id: 7,
        },
      ],
      //ASC -> 오름차
      //DESC -> 내림차
      order: {
        id: 'ASC',
      },

      //처음 몇개를 제외할지
      skip: 2,
      //첫번째부터 몇개를 가져올지
      take: 0,
    });
  }
그 외 자주 사용되는 typeorm method 정리
preload
   //preload
    //입력된 값을 기반으로 데이터베이스에 있는 데이터를 불러오고
    //추가 입력된 값으로 데이터베이스에서 가져온 값을 대체함
    // 저장하지는 않음
     const user3 = await this.userRepository.preload({
       id: 101,
       email: 'coding@naver.com',
     });
decrement / increment
 // 값을 감소시킴
    await this.userRepository.decrement(
      {
        id: 8,
      },
      'count',
      2,
    );

    //값을 증가시킴
    await this.userRepository.increment(
      {
        id: 8,
      },
      'count',
      2,
    );
count
 //갯수 카운팅하기
     const count = await this.userRepository.count({
       where: {
         email: ILike('%0%'),
       },
     });
sum
 //sum
     const sum = await this.userRepository.sum('count', {
       email: ILike('%@%'),
     });
average
   //average
     const average = await this.userRepository.average('count', {
       id: LessThan(4),
     });
min / max
 const min = await this.userRepository.minimum('count', {
      id: LessThan(10),
    });

    const max = await this.userRepository.maximum('count', {
      id: LessThan(10),
    });
findAndCount
   //페이지네이션할 때 유용 take안했을 때 count도 가져옴
    const userAndCount = await this.userRepository.findAndCount({
      take: 3,
    });
강의출처
[코드팩토리] [초급] NestJS REST API 백엔드 완전 정복 마스터 클래스 - NestJS Core 강의 | 코드팩토리 -
코드팩토리 | 자바스크립트, 타입스크립트 다음은 백엔드 개발! NestJS를 이용한 REST API 백엔드 개발, Socket IO 개발 및 배포를 할 수 있게 됩니다., 백엔드가 처음이어도 누구나 OK! 트렌디한 NestJS로
www.inflearn.com