목차
리덕스의 정의
javascript의 상태관리 라이브러리이다.
- 여러 컴포넌트가 공유하는 상태를 관리하기 위한 라이브러리로, 메타(페이스북)가 설계한 flux 규격에 맞추어져 있다.
- 리액트와 사용하기 위해서는 RTK(React Tool Kit)을 함께 설치해야 한다.
- 리액트 컨텍스트에 기반을 둔 라이브러리로 Provider 컴포넌트가 항상 취상위로 동작해야 한다.
리액트에서는 다음과 같은 상태가 있다.
local state
단일 컴포넌트에 속해있는 상태로 예로는 useState, useReducer가 있다.
cross-component state
여러 컴포넌트에 속해 있는 상태로 예로는 프롭스 드릴링, 프롭스 체인이 있다.
app-wide state
전체 앱에 영향을 미치는 상태로 예로는 프롭스 드릴링, 프롭스 체인이 있다.
아래 두가지 상태는 react context나 redux를 통해 상태관리가 가능하다.
그렇다면 react context 대신 redux를 사용하는 이유가 무엇일까?
1. context는 복잡한 앱인 경우 무수히 많은 컴포넌트의 중첩을 낳을 수 있다.
2. 빈번한 상태 변경의 경우 성능면에서 좋지 않다.
리덕스의 작동 방식
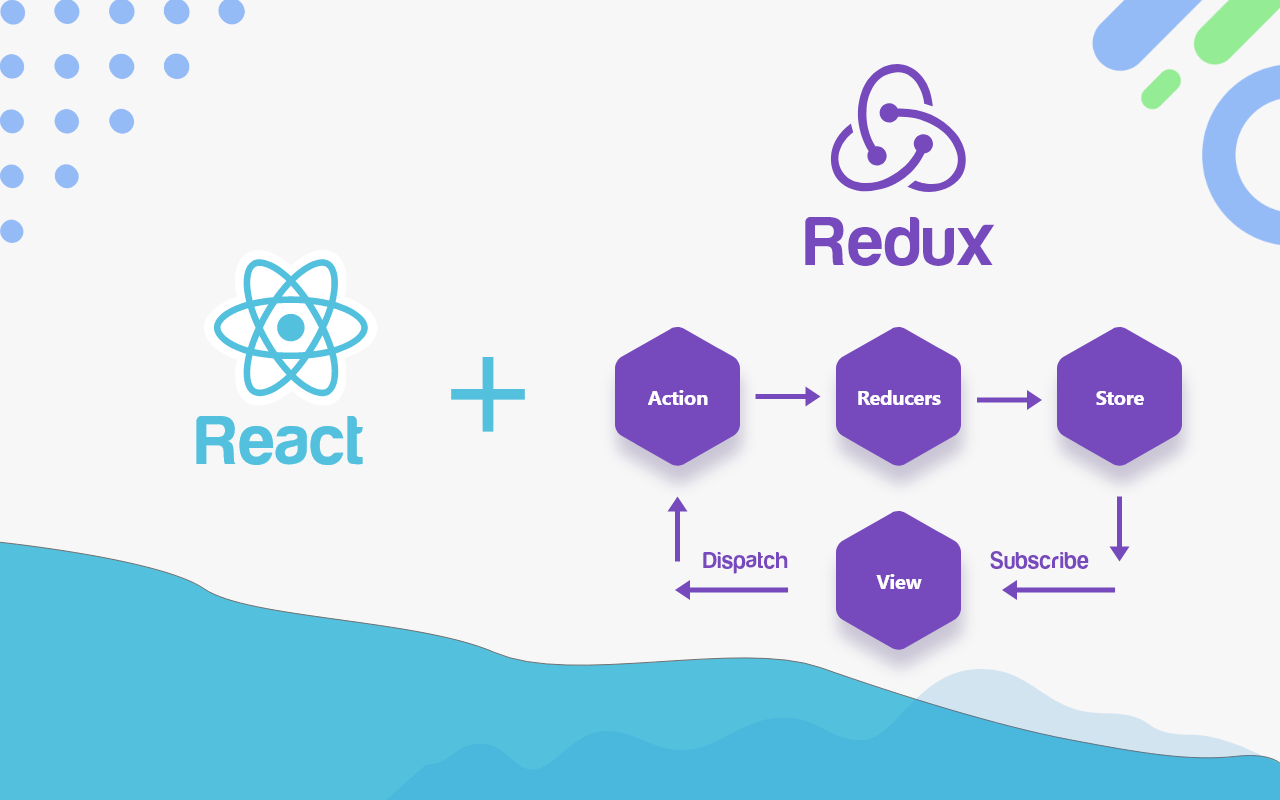
리덕스는 한 개의 중앙 상태 관리 저장소를 갖는다. 그 곳에서 모든 상태를 관리한다고 볼 수 있다.
그에 대해 컴포넌트는 저장소를 구독하고 데이터가 변경될 때마다 컴포넌트는 저장소로부터 필요한 데이터를 받게 된다.
여기서 중요한 점은 컴포넌트는 저장된 데이터를 직접 조작하지 않는다는 것이다. 즉 저장소에서 컴포넌트로 가는 단방향의 데이터 흐름을 갖는다.
그래서 저장소의 데이터를 변경하기 위해서는 reducer라는 함수를 이용해야 한다.
그렇다면 컴포넌트와 리듀서 함수를 연결을 통해 데이터의 변경을 해야 하는데 어떻게 할까? 바로 action을 이용하는 것이다.
그렇게 해서 리듀서가 새로운 상태를 반환하면 중앙 저장소의 상태가 업데이트가 되고 구독중인 컴포넌트는 알림을 받고 ui를 업데이트할 수 있게 된다.
리덕스 활용 방법
1. 저장소 만들기
아래와 같이 먼저 중앙 상태 저장소를 만들어 주고 export 해준다. 또한 각 action별 상태를 반환해준다.
Index.jsx
import { createStore } from "redux";

const counterReducer = (state = { counter: 0 }, action) => {
  if (action.type === "increment") {
    return {
      counter: state.counter + 1,
    };
  }
  if (action.type === "decrement") {
    return {
      counter: state.counter - 1,
    };
  }
  //action을 이용해 유동적으로 만들 수 있다.
  if (action.type === "increase") {
    return {
      counter: state.counter + action.amount,
    };
  }
  return state;
};
const store = createStore(counterReducer);

export default store;
2. provider을 통해 저장소 공급하기
컴포넌트에 Provider을 감싸주고 store을 제공한다.
App.jsx
import store from "./ReduxProject/store/index";
import Redux1 from "./ReduxProject/Redux1";
import { Provider } from "react-redux";
function App() {
  return (
    <Provider store={store}>
      {" "}
      <Redux1 ></Redux1>
    </Provider>
  );
}

export default App;
3. useSelector와 useDispatch 사용하기
내부의 컴포넌트에서 사용할려면 useSelector를 통해 상태를 가져오고 dispatch를 통해 액션을 가져온다.
Counter.jsx
import classes from "./Counter.module.css";
import { useSelector, useDispatch } from "react-redux";

function Counter() {
  //useDispatch를 통해 action을 dispatch한다.
  const disptch = useDispatch();

  //자동으로 selectoer을 통해 구독을 함
  //최신상태를 useSelectoer을 통해 받아온다.
  const counter = useSelector((state) => state.counter);


  const toggleCounterHandler = () => {};
  function incrementHandler() {
    disptch({ type: "increment" });
  }
  function decrementHandler() {
    disptch({ type: "decrement" });
  }
    function increaseHandler(amount) {
    disptch({ type: "increase", amount: amount });
  }

  return (
    <main className={classes.counter}>
      <h1>Redux Counter</h1>
      <div className={classes.value}>{counter}</div>
      <div className="counter">
        <button onClick={incrementHandler}>Increment</button>
        <button onClick={decrementHandler}>Decrement</button>
         <button onClick={() => increaseHandler(5)}>Increase by 5</button>
      </div>
      <button onClick={toggleCounterHandler}>Toggle Counter</button>
    </main>
  );
}

export default Counter;
+추가 리덕스 툴킷 사용하기
리덕스는 내부적으로 immer라는 다른 패키지를 이용하여 자동으로 원래 상태를 복제하고 새로운 객체를 생성시켜준다.
즉 불변성을 자동으로 지킬 수 있다. 또한 고유 식별자 생성이나 코드의 비대함을 막을 수 있다.
Index.jsx
import { createSlice, configureStore } from "@reduxjs/toolkit";
const initialState = { counter: 0, showCounter: true };

//이런식으로 고유식별자를 직접 생성할 필요가 없고 코드가 길어지는 것을 막을 수 있다.
const counterSlice = createSlice({
  name: "counter",
  initialState,
  reducers: {
    increment(state) {
      state.counter++;
    },
    decrement(state) {
      state.counter--;
    },
    increase(state, action) {
      state.counter = state.counter + action.payload;
    },
    toggleCounter(state) {
      state.showCounter = !state.showCounter;
    },
  },
});

//configureStore은 여러 reducer를 병합한다.
const store = configureStore({
    reducer: counterSlice.reducer});

export const counterActions = counterSlice.actions;
export default store;
Counter.jsx
import classes from "./Counter.module.css";
import { useSelector, useDispatch } from "react-redux";
import { counterActions } from "../store";
function Counter() {
  //자동으로 selectoer을 통해 구독을 함
  const disptch = useDispatch();
  const counter = useSelector((state) => state.counter);
  const show = useSelector((state) => state.showCounter);
  function toggleCounterHandler() {
    disptch(counterActions.toggleCounter());
  }
  function incrementHandler() {
    disptch(counterActions.increment());
  }
  function decrementHandler() {
    disptch(counterActions.decrement());
  }
  function increaseHandler(amount) {
    disptch(counterActions.increase(amount));
  }
  return (
    <main className={classes.counter}>
      <h1>Redux Counter</h1>
      {show && <div className={classes.value}>{counter}</div>}
      <div className="counter">
        <button onClick={incrementHandler}>Increment</button>
        <button onClick={decrementHandler}>Decrement</button>
        <button onClick={() => increaseHandler(5)}>Increase by 5</button>
      </div>
      <button onClick={toggleCounterHandler}>Toggle Counter</button>
    </main>
  );
}

export default Counter;
+추가 thunk를 활용하여 비동기 통신 해보기
이런식으로 활용 가능하다..
import { displayAction } from "./Ui";
import { ItemActions } from "./CartItem";
//액션 생성자 thunk의 사용 -> dispatch인자를 제공해 준다.

export function getCartData() {
  return async (dispatch) => {
    async function fetchData() {
      const response = await fetch(
        "https://practice-40a9d-c925a.firebaseio.com/cart.json"
      );
      if (!response.ok) {
        dispatch(
          displayAction.setNotification({
            status: "success",
            title: "Success!",
            message: "Getting cart data!",
          })
        );
      }
      return await response.json();
      //console.log(responseData);
    }
    try {
      const responseData = await fetchData();
      dispatch(ItemActions.setting(responseData));
      dispatch(
        displayAction.setNotification({
          status: "success",
          title: "Success!",
          message: "Getting cart data!",
        })
      );
    } catch (error) {
      dispatch(
        displayAction.setNotification({
          status: "error",
          title: "Error!",
          message: "Fetch cart data failed..",
        })
      );
    }
  };
}
  const cartItems = useSelector((state) => state.cartItem.items);

  useEffect(() => {
      dispatch(sendCartData(cartItems));
}, [cartItems, dispatch]);'코딩 정보 > React' 카테고리의 다른 글
| [React] 통신을 위한 Json과 response, error에 대해 알아보자 (0) | 2024.08.21 |
|---|---|
| [React] 라우터의 개념과 활용 방법에 대해 알아보자 (1) | 2024.08.16 |
| [React] useEffect와 관련되어 순차적으로 에러 핸들링 해보기 (0) | 2024.08.10 |
| [React] 재활용성이 좋은 modal 만들기 (0) | 2024.08.10 |
| [React] useEffect의 실행 시점에 대해 알아보자 (0) | 2024.08.09 |


