


728x90
반응형
목차
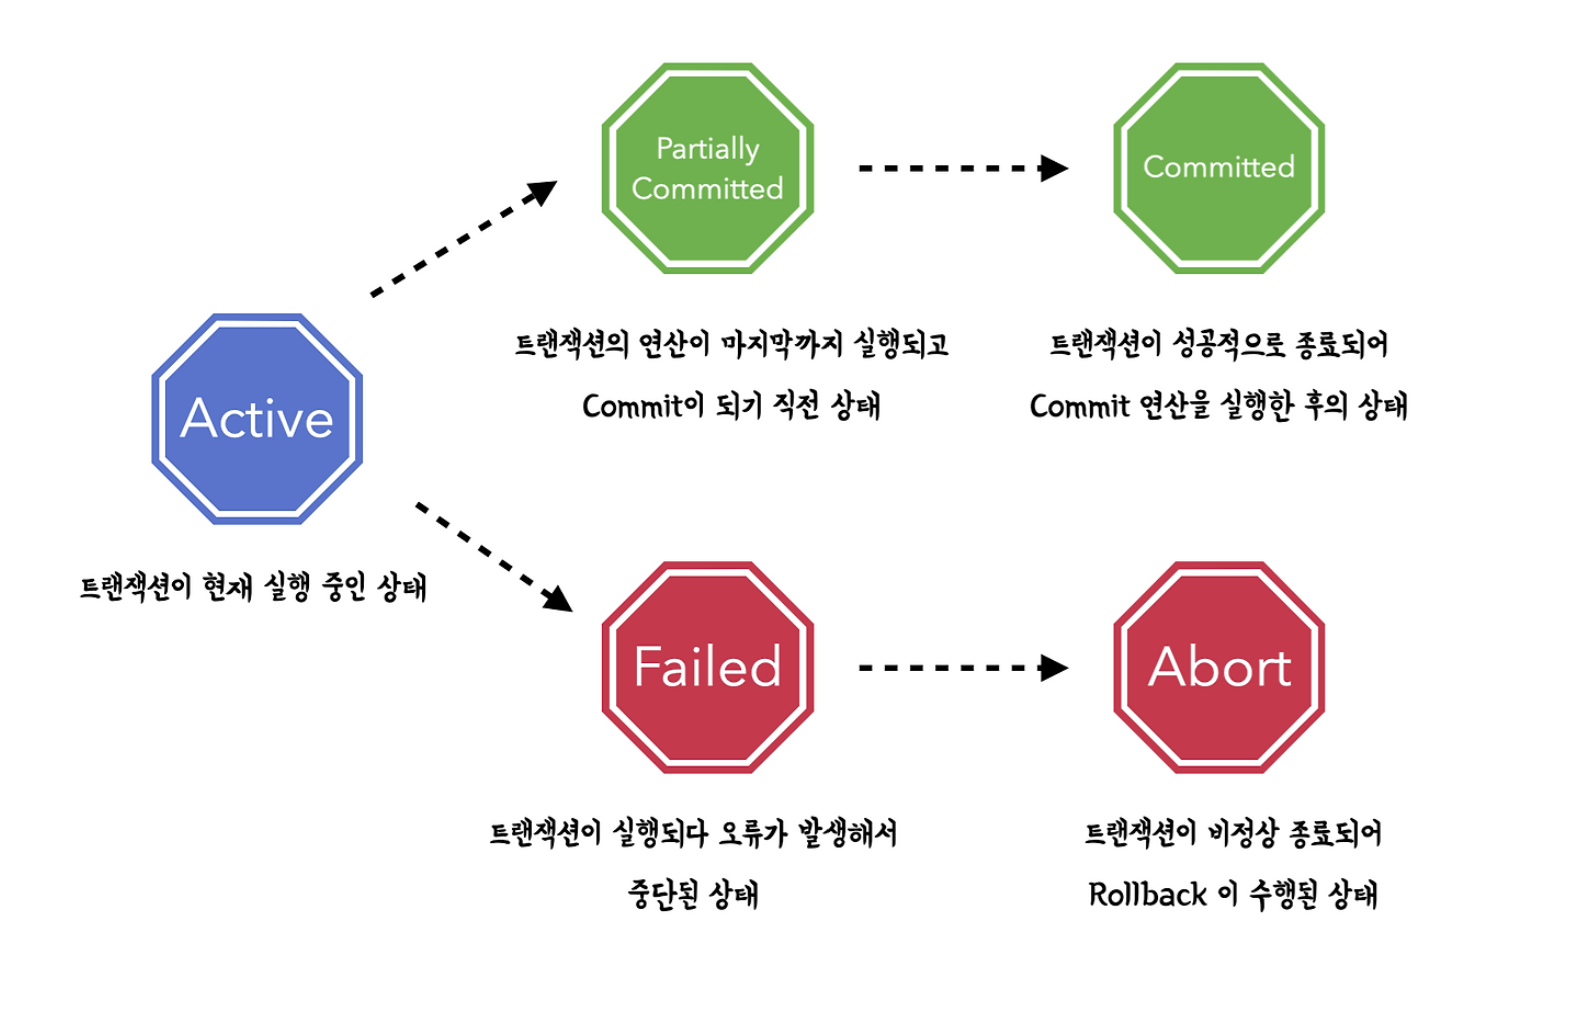
트랜잭션이란?
트랜잭션은 데이터베이스의 상태를 변환시키는 하나의 논리적 기능을 수행하기 위한 작업의 단위 또는 한꺼번에
모두 수행되어야 할 일련의 연산들을 의미한다.
트랜잭션의 특징
- 트랜잭션은 데이터베이스 시스템에서 병행 제어 및 회복 작업 시 처리되는 작업의 논리적 단위이다.
- 사용자가 시스템에 대한 서비스 요구 시 시스템이 응답하기 위한 상태 변환 과정의 작업단위이다.
- 하나의 트랜잭션은 commit되거나 rollback 된다.
구현해 볼 트랜잭션
-> 포스트를 할 때 이미지를 여러개 올리면 오류가 나는 경우가 있다.
이때 이미지가 잘 처리되지 않으면 포스트조차 올라가면 안된다.
posts.controller.ts
 @Post()
  @UseGuards(AccessTokenGuard)
  async postPosts(@User('id') userId: number, @Body() body: CreatePostDto) {
    //오류 생기면 롤백되야 함

    //트랜잭션과 관련된 모든 쿼리를 담당할
    //쿼리 러너를 생성한다.
    const qr = this.dataSource.createQueryRunner();

    //쿼리 러너에 연결한다.
    await qr.connect();
    //쿼리 러너에서 트랜잭션을 시작함
    //이 시점부터 같은 쿼리 러너를 사용하면
    // 트랜잭션 안에서 데이터베이스 액션을 실행 할 수 있다.

    await qr.startTransaction();

    //로직 실행
    try {
      const post = await this.postsService.createPost(userId, body, qr);
      //throw new InternalServerErrorException("트랜잭션 에러 확인용")

      for (let i = 0; i < body.images.length; i++) {
        await this.postsImageService.createPostImage(
          {
            post,
            path: body.images[i],
            order: i,
            type: ImageModelType.POST_IMAGE,
          },
          qr,
        );
      }
      await qr.commitTransaction();
      await qr.release();
      return this.postsService.getPostById(post.id);
    } catch (e) {
      //어떤 에러든 에러가 던져지면
      //트랜잭션을 종료하고 원래 상태로 되돌린다.
      await qr.rollbackTransaction();
      await qr.release();
      throw new InternalServerErrorException("포스트 에러 발생")
    }
  }
트랜잭션 전용 레포지토리에 묶어서 저장해야 하기 때문에 로직을 수정해야 한다.
typeorm을 바탕으로 자동으로 엔티티가 같은 곳에 저장된다.
수정된 createPost 로직
  getRepository(qr?: QueryRunner) {
    return qr
      ? qr.manager.getRepository<PostsModel>(PostsModel)
      : this.postsRepository;
  }

  async createPost(authorId: number, postDto: CreatePostDto, qr?: QueryRunner) {
    // 1) create -> 저장할 객체를 생성한다 자동완성을 제공하기 때문에
    // 2) save method -> 객체를 저장한다

    const repository = this.getRepository(qr);
    if (!authorId) {
      throw new Error('Invalid authorId: authorId cannot be null or undefined');
    }

    const post = repository.create({
      author: {
        id: authorId,
      },
      ...postDto,
      images: [],
      likeCount: 0,
      commentCount: 0,
    });
    const newPost = await repository.save(post);

    return newPost;
  }
수정된 createPostImage 로직
  getRepository(qr?: QueryRunner) {
    return qr
      ? qr.manager.getRepository<ImageModel>(ImageModel)
      : this.imageRepository;
  }

  async createPostImage(dto: CreatePostImageDto, qr?: QueryRunner) {
    // dto의 이미지 이름을 기반으로
    // 파일의 경로를 생성한다.
    const repository = this.getRepository(qr);
    const tempFilePath = posix.join(TEMP_FOLDER_PATH, dto.path);

    try {
      // 파일이 존재하는지 확인
      // 만약에 존재하지 않는다면 에러를 던짐
      await promises.access(tempFilePath);
    } catch (e) {
      throw new BadRequestException('존재하지 않는 파일 입니다.');
    }

    // 파일의 이름만 가져오기
    const fileName = basename(tempFilePath);

    //새로 이동할 포스트 폴더의 경로 + 이미지 이름
    // /public/posts/asdf.jpg
    const newPath = posix.join(POST_IMAGE_PATH, fileName);

    const result = await repository.save({
      ...dto,
    });

    await promises.rename(tempFilePath, newPath);
    return result;
  }
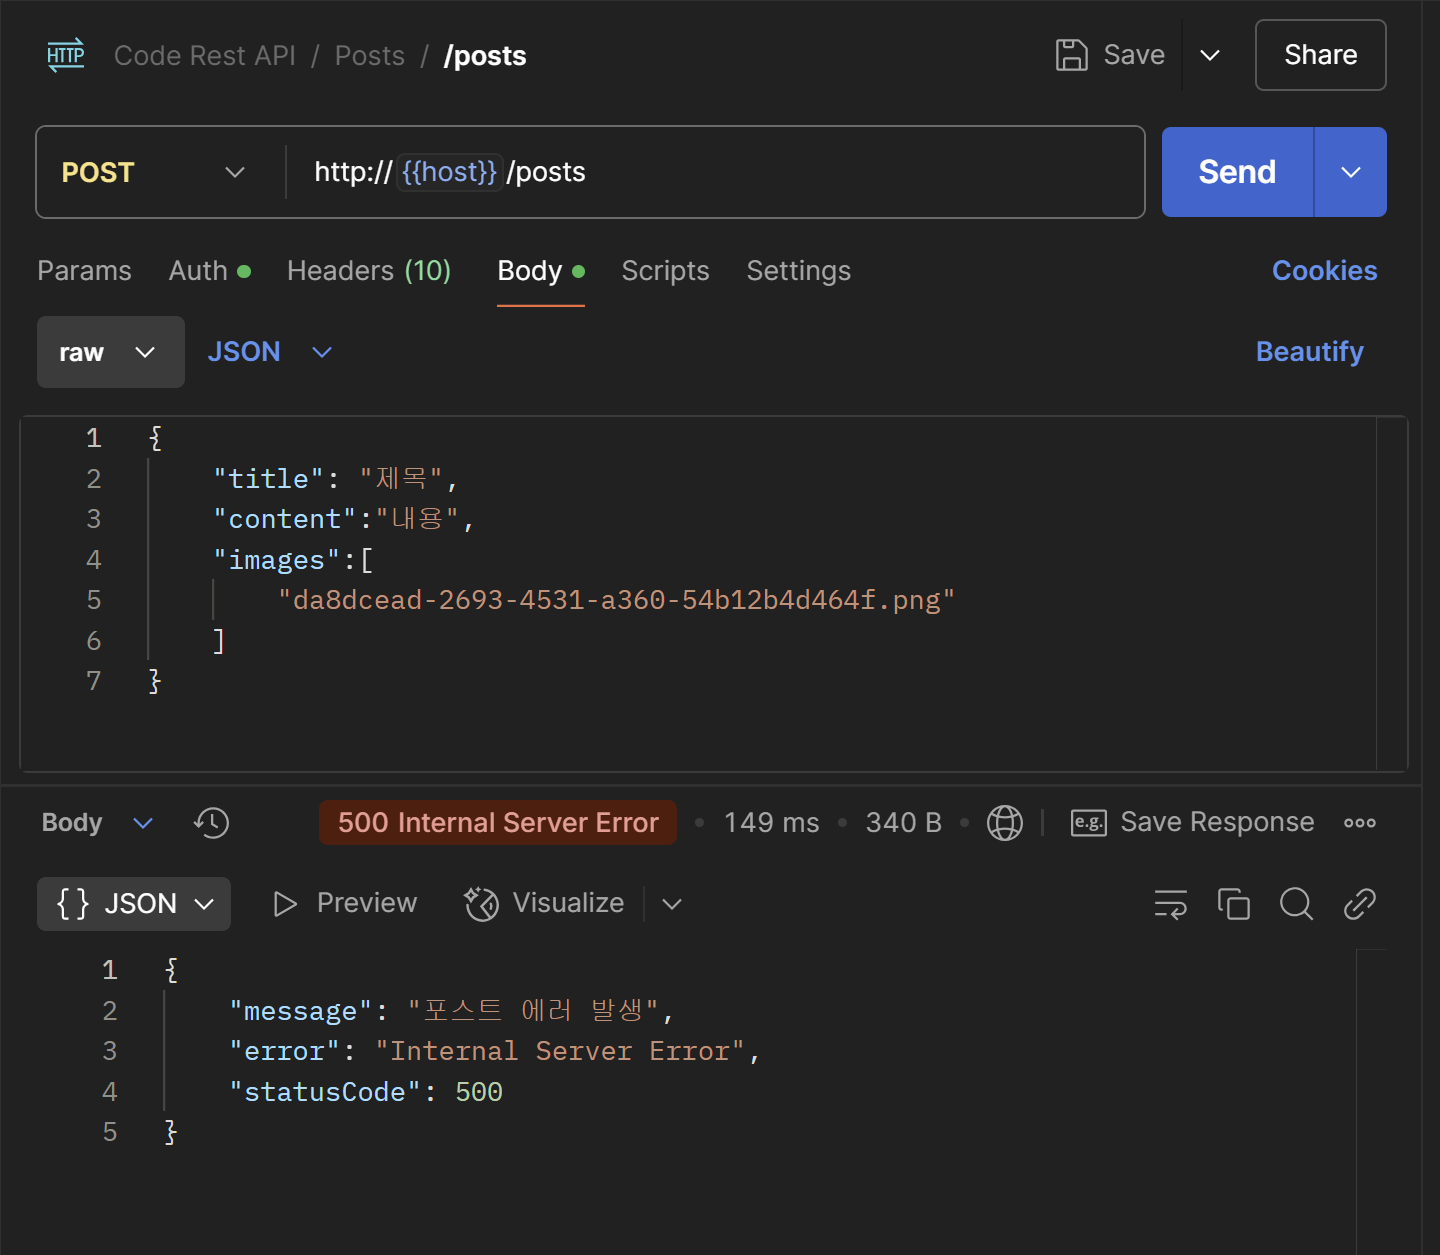
에러 발생 시
이런식으로 에러를 발생시켜 보면 저장이 안되는 것을 확인할 수 있다.
 //로직 실행
    try {
      const post = await this.postsService.createPost(userId, body, qr);
      throw new InternalServerErrorException("트랜잭션 에러 확인용")

      for (let i = 0; i < body.images.length; i++) {
        await this.postsImageService.createPostImage(
          {
            post,
            path: body.images[i],
            order: i,
            type: ImageModelType.POST_IMAGE,
          },
          qr,
        );
      }
      await qr.commitTransaction();
      await qr.release();
      return this.postsService.getPostById(post.id);
    } catch (e) {
      //어떤 에러든 에러가 던져지면
      //트랜잭션을 종료하고 원래 상태로 되돌린다.
      await qr.rollbackTransaction();
      await qr.release();
      throw new InternalServerErrorException("포스트 에러 발생")
    }
  }
강의출처
[코드팩토리] [초급] NestJS REST API 백엔드 완전 정복 마스터 클래스 - NestJS Core 강의 | 코드팩토리 -
코드팩토리 | , 백엔드가 처음이어도 누구나 OK! 트렌디한 NestJS로 서버 개발을 배워보세요. NestJS 프레임워크 마스터 클래스 : Part 1 Node.js 기반 백엔드 서버 프레임워크, NestJS의 라이프사이클에서
www.inflearn.com
반응형
'코딩 정보 > NestJs' 카테고리의 다른 글
| [NestJs] Exception Filter를 구현해 보자 (0) | 2025.02.10 |
|---|---|
| [NestJs] interceptor를 구현 해보자(트랜잭션, 콘솔로그) (1) | 2025.02.10 |
| 이미지 업로드를 구현해 보자 (하) (2) | 2025.02.05 |
| [NestJs] 이미지 업로드를 구현 해보자 (0) | 2025.02.04 |
| [NestJs] 환경변수 세팅을 해보자 (0) | 2025.02.03 |