


목차
Interceptor란?
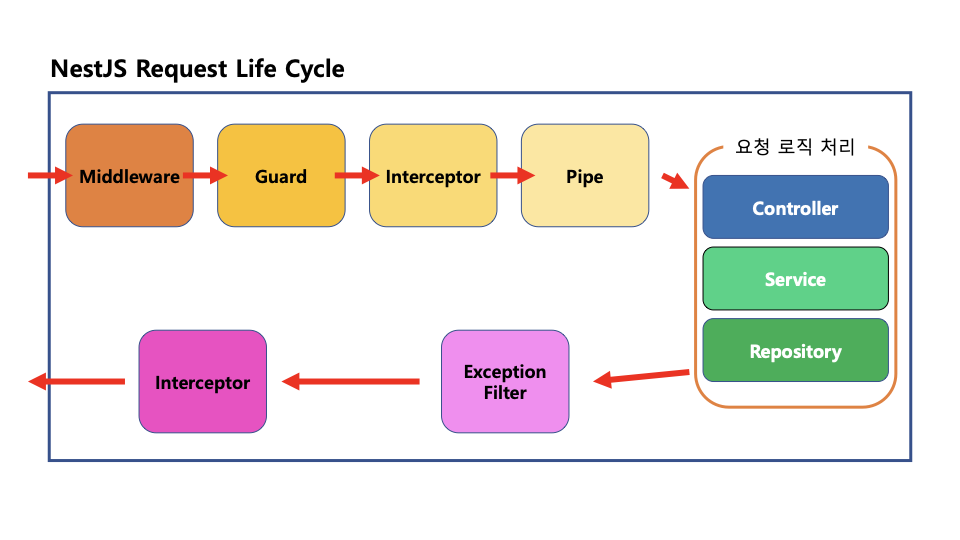
아래 life cycle를 통해 알 수 있듯이 interceptor는 request와 response에서 둘다 작동한다.
공식 문서에서는 다음과 같이 설명한다.
인터셉터(Interceptors)는 관점 지향 프로그래밍(AOP, Aspect-Oriented Programming) 기술에서 영감을 받은 다양한 기능을 제공한다. 이를 통해 다음과 같은 작업이 가능하다:
- 메서드 실행 전/후에 추가 로직을 바인딩할 수 있다.
- 함수가 반환하는 결과를 변환할 수 있다.
- 함수에서 발생한 예외를 변환할 수 있다.
- 기본 함수의 동작을 확장할 수 있다.
- 특정 조건(예: 캐싱 목적)에 따라 함수를 완전히 재정의할 수 있다.
interceptor를 다루게 되면 rxjs를 알아야 한다.
아래 잘 설명이 되어있으므로 참고 해보자
Rxjs 한번 배워보실래요?
나: "그래서 RxJs를 대체 할 만한게 있을까요?" > 크루: "솔직히 비동기나 시간을 다루는 데에는 Rxjs를 대체 할 만한게 없긴 하죠. 진짜 좋다고 생각해요. ... 배우기 어려워서 그렇지. 웬만한 개발자
velog.io
tab, pipe, map 등 주요 메서드만 알아도 사용하는데 크게 문제는 안될 것 같다.
시간 측정용 로그 interceptor 만들어 보기
log.interceptor.ts
import {
  CallHandler,
  ExecutionContext,
  Injectable,
  NestInterceptor,
} from '@nestjs/common';
import { map, Observable, tap } from 'rxjs';

@Injectable()
export class LogInterceptor implements NestInterceptor {
  intercept(
    context: ExecutionContext,
    next: CallHandler<any>,
  ): Observable<any> {
    /**
     * 요청이 들어올 때 REQ 요청이 들어온 타임스탬프를 찍는다.
     * [REQ] {요청 path} {요청 시간}
     *
     * 요청이 끝날 때 (응답이 나갈때) 다시 타임스탬프를 찍는다.
     * [RES] {요청 path} {응답 시간} {얼마나 걸렸는지 ms}
     */
    const req = context.switchToHttp().getRequest();
    const path = req.originalUrl;

    const now = new Date();

    console.log(`[REQ] ${path} ${now.toLocaleString('kr')}`);

    // return next.handle()을 실행하는 순간
    // 라우트의 로직이 전부 실행되고 응답이 반환된다.
    // observable로
    return next.handle().pipe(
      //   tap((observable) => console.log(observable)),
      //   map((observable) => {
      //     return {
      //       message: '응답이 변경 됐습니다.',
      //       response: observable,
      //     };
      //   }),
      //   tap((observable) => console.log(observable)),
      tap((observable) =>
        console.log(
          `[RES] ${path} ${new Date().toLocaleString('kr')} ${new Date().getMilliseconds() - now.getMilliseconds()}ms `,
        ),
      ),
    );
  }
}
posts.controller.ts
 @Get()
  @UseInterceptors(LogInterceptor)
  getPosts(@Query() query: paginatePostDto) {
    return this.postsService.paginationPosts(query);
    // return this.postsService.getAllPosts();
  }
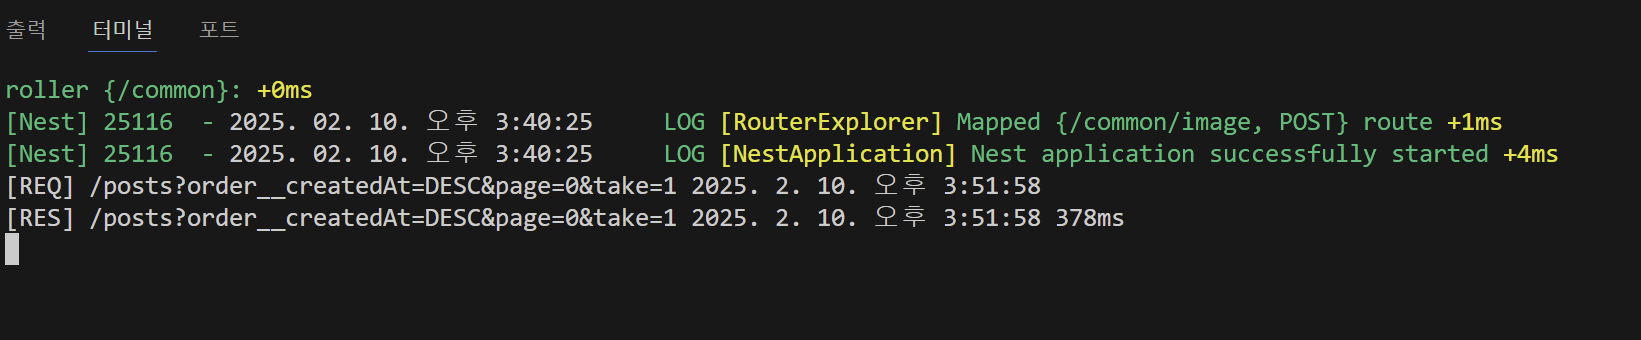
아래와 같이 잘 나오는 것을 볼 수 있다.
transaction용 interceptor 만들어 보기
이전에 만들었던 트랜잭션용 코드를 보자
request와 response로 나누어 충분히 interceptor를 만드는 것이 가능해 보인다.
 @Post()
  @UseGuards(AccessTokenGuard)
  async postPosts(@User('id') userId: number, @Body() body: CreatePostDto) {
    //오류 생기면 롤백되야 함

    //트랜잭션과 관련된 모든 쿼리를 담당할
    //쿼리 러너를 생성한다.
    const qr = this.dataSource.createQueryRunner();

    //쿼리 러너에 연결한다.
    await qr.connect();
    //쿼리 러너에서 트랜잭션을 시작함
    //이 시점부터 같은 쿼리 러너를 사용하면
    // 트랜잭션 안에서 데이터베이스 액션을 실행 할 수 있다.

    await qr.startTransaction();

    //로직 실행
    try {
      const post = await this.postsService.createPost(userId, body, qr);
      //throw new InternalServerErrorException("트랜잭션 에러 확인용")

      for (let i = 0; i < body.images.length; i++) {
        await this.postsImageService.createPostImage(
          {
            post,
            path: body.images[i],
            order: i,
            type: ImageModelType.POST_IMAGE,
          },
          qr,
        );
      }
      await qr.commitTransaction();
      await qr.release();
      return this.postsService.getPostById(post.id);
    } catch (e) {
      //어떤 에러든 에러가 던져지면
      //트랜잭션을 종료하고 원래 상태로 되돌린다.
      await qr.rollbackTransaction();
      await qr.release();
      throw new InternalServerErrorException("포스트 에러 발생")
    }
  }
transaction.interceptor.ts
import {
  CallHandler,
  ExecutionContext,
  Injectable,
  InternalServerErrorException,
  NestInterceptor,
} from '@nestjs/common';
import { catchError, map, Observable, tap } from 'rxjs';
import { DataSource } from 'typeorm';
@Injectable()
export class TransactionInterceptor implements NestInterceptor {
  constructor(private readonly dataSource: DataSource) {}

  async intercept(
    context: ExecutionContext,
    next: CallHandler<any>,
  ): Promise<Observable<any>> {
    const req = context.switchToHttp().getRequest();

    //트랜잭션과 관련된 모든 쿼리를 담당할
    //쿼리 러너를 생성한다.
    const qr = this.dataSource.createQueryRunner();

    //쿼리 러너에 연결한다.
    await qr.connect();
    //쿼리 러너에서 트랜잭션을 시작함
    //이 시점부터 같은 쿼리 러너를 사용하면
    // 트랜잭션 안에서 데이터베이스 액션을 실행 할 수 있다.

    await qr.startTransaction();
    req.queryRunner = qr;

    return next.handle().pipe(
      catchError(async (e) => {
        await qr.rollbackTransaction();
        await qr.release();
        throw new InternalServerErrorException(e.message);
      }),
      tap(async () => {
        await qr.commitTransaction();
        await qr.release();
      }),
    );
  }
}
우리는 qr을 가져다 써야하므로 데코레이터를 통해 가져와 보자
데코레이터를 통해 queryRunner 가져오기
query-runner.decorator.ts
import {
  createParamDecorator,
  ExecutionContext,
  InternalServerErrorException,
} from '@nestjs/common';

export const QueryRunner = createParamDecorator(
  (_, context: ExecutionContext) => {
    const req = context.switchToHttp().getRequest();

    if (!req.queryRunner) {
      throw new InternalServerErrorException(
        'QueryRunner Decorator를 사용하려면 TransactionInterceptor를 사용해야 합니다',
      );
    }
    return req.queryRunner;
  },
);
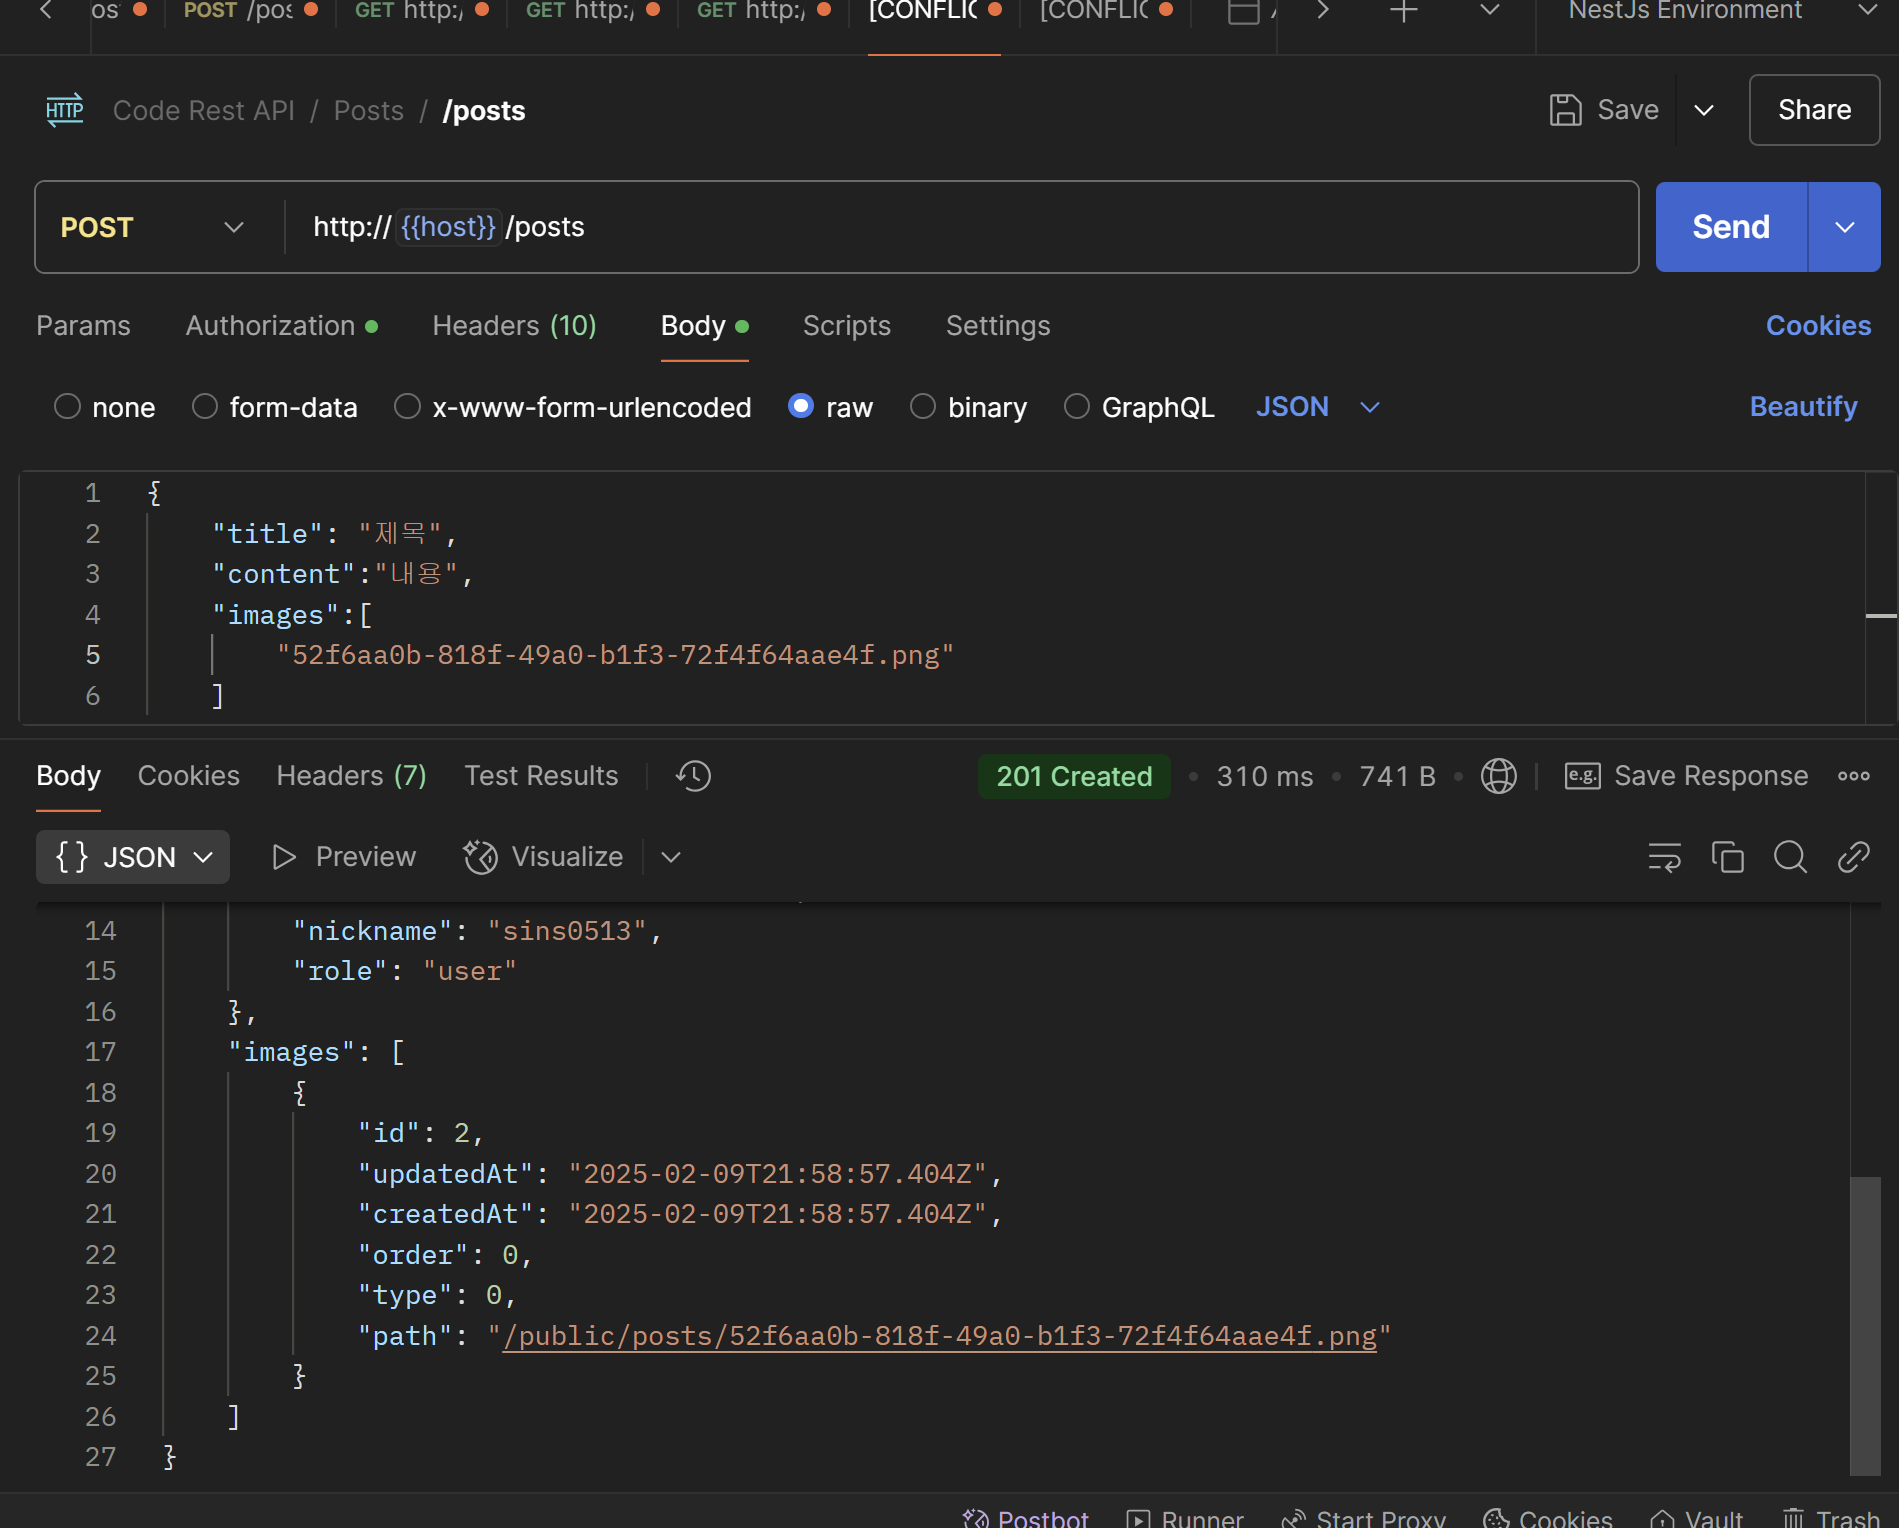
아래와 같이 로직이 잘 정돈 된것을 볼 수 있다.
 @Post()
  @UseGuards(AccessTokenGuard)
  @UseInterceptors(TransactionInterceptor)
  async postPosts(
    @User('id') userId: number,
    @Body() body: CreatePostDto,
    @QueryRunner() qr: Qr,
  ) {
    //로직 실행

    const post = await this.postsService.createPost(userId, body, qr);
    //throw new InternalServerErrorException("트랜잭션 에러 확인용")

    for (let i = 0; i < body.images.length; i++) {
      await this.postsImageService.createPostImage(
        {
          post,
          path: body.images[i],
          order: i,
          type: ImageModelType.POST_IMAGE,
        },
        qr,
      );
    }

    return this.postsService.getPostById(post.id, qr);
  }
강의출처
[코드팩토리] [초급] NestJS REST API 백엔드 완전 정복 마스터 클래스 - NestJS Core 강의 | 코드팩토리 -
코드팩토리 | , 백엔드가 처음이어도 누구나 OK! 트렌디한 NestJS로 서버 개발을 배워보세요. NestJS 프레임워크 마스터 클래스 : Part 1 Node.js 기반 백엔드 서버 프레임워크, NestJS의 라이프사이클에서
www.inflearn.com
'코딩 정보 > NestJs' 카테고리의 다른 글
| [NestJs] middleware를 구현해 보자 (0) | 2025.02.10 |
|---|---|
| [NestJs] Exception Filter를 구현해 보자 (0) | 2025.02.10 |
| [NestJs] 트랜잭션을 구현해 보자 (0) | 2025.02.08 |
| 이미지 업로드를 구현해 보자 (하) (2) | 2025.02.05 |
| [NestJs] 이미지 업로드를 구현 해보자 (0) | 2025.02.04 |